Time to take a seller vacation? Holidays used to be simple: you’d ask for some time off, put your out-of-office on, and enjoy yourself guilt-free. But when selling on Amazon, treating yourself to some time off isn’t as cut-and-dry as it used to be.
After all, you, as a seller, are now in charge of everything and are responsible for making sure everything operates smoothly…even while you’re away – and this is especially true if your orders are fulfilled by Amazon (FBA) as opposed to by you (FBM). Luckily, with a bit of help from eDesk, you can go back to taking some much-deserved time off and hardly miss a beat. Here’s how to put your account (and yourself) in vacation mode…
What does Amazon Seller Vacation Mode Mean?
As we said before, booking a vacation is easier when you’re a small cog in a large corporate wheel, but the whole axle doesn’t have to come apart now that you’re an Amazon seller. All that’s required is being more methodical with your planning ahead of time.
If you sell via Fulfilled by Merchant (FBM), you’ll need to activate vacation mode on your listings. But if you sell via Fulfilled by Amazon (FBA), then your orders will go ahead as usual and you’ll only need to plan ahead for inventory management during your time off. N.B. Make sure you’re using the right inventory management tools to keep things running smoothly, because the specific requirements and impact of vacation settings differ significantly between FBA vs FBM sellers.
Before you change your Amazon vacation settings on your listings, go over all the points below, so that flipping the switch is a simple: no-thought process.
Make Sure All Pending Orders are Complete Before you put your Amazon Seller Account on Vacation Mode
Buyers don’t care that you’re on vacation and won’t find it an acceptable reason to wait on their purchases, so make sure all pending orders are fulfilled first. Once you do that, you’ll be clear to inactivate your listings, but doing so doesn’t automatically cancel pending orders – they’ll still be there, waiting to be fulfilled.
Remember that vacation mode doesn’t retroactively cancel existing orders, so it’s crucial to fulfill all pending orders before activating it to avoid negative impacts on your Amazon seller metrics.
Write an Automatic Message Reply for your Amazon Business before you go on Vacation
If you’re not using helpdesk software such as eDesk for automating responses to stay within your SLAs, then make sure you follow all the steps here to activate vacation mode. Not responding to customer questions can hurt your seller metrics and generate negative reviews. It’s much better to have a template response that goes out automatically when you’re away, to prevent this from happening, and vacation mode allows you to do this.
This doesn’t have to be anything long or hugely detailed, so much as a simple message to let customers know you’re away, and for how long, so they know when they’ll be able to place orders again. Managing customer messages while away is essential for maintaining your seller performance metrics, even during vacation.
Inactivate Listings through Amazon Seller Central with Plenty of Notice
The last step in the process is changing your listings to inactive so that customers can’t place orders. You’ll want to give yourself at least two days to do this. If you change them with less than 48 hours to go, you risk getting orders that you’ll have to fulfill, which could cut into your vacation time. But if you change them to inactive too many days ahead of time, you could be losing out on orders that could very easily be fulfilled before you go away.
Vacation Mode Work: The Seller Central Account Work Doesn’t Completely Stop When you Activate Vacation Mode
Unfortunately, you’ll have to check your account a little while you’re away, or assign tasks to someone trustworthy and reliable. The biggest check-in to do is responding to buyers within 24 hours, so you can maintain good seller account metrics, as Amazon requires you to provide them with an answer within that timeframe.
If you’ve opted to do this yourself, make sure your staff know about this. Amazon can suspend your account if it sees too many logins from multiple devices, so either have your staff stick to logging in on their work computers or make sure you’re using the same phone or laptop on the same IP address.
Whichever decision you go with, getting back to customers within that 24-hour window really goes a long way toward maintaining customer response time and protecting your brand’s reputation as an active and engaging one, and maintaining its value even while not accepting and fulfilling orders.
Reduce Work By Automating Processes with Amazon Seller Account Vacation Mode
Although you’ve set your listings to inactive, you still have the option to keep things going a bit by automating certain things. One of those is creating and editing listings, which will take effect once they’ve been set to active when you decide they (and you) are ready.
Another is responding to claims or complaints. You can do this with the templated messages we mentioned earlier, or you can (and we prefer this option) use an automated feedback app to send out messages under certain conditions.
The Final Step to using Vacation Mode: Changing Your Vacation Settings on Amazon Back to Normal
Instead of re-listing the previously inactive listings, all you have to do is turn vacation mode off, and your listings will automatically be active and visible again, just as they were before. Try to respond to customer messages within 24 hours of your return (seller vacation mode allows you to tell customers when you’ll be back).
Recap: How to Turn on Amazon Vacation Mode in Seller Central (3 Easy Steps)
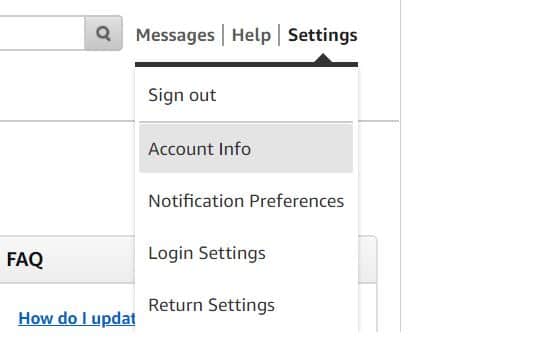
1. Log into your Seller Central account. Select “Account Info” from the Settings tab in the top-right corner of the screen.
2. Select Listing Status then click on “Going on vacation?”
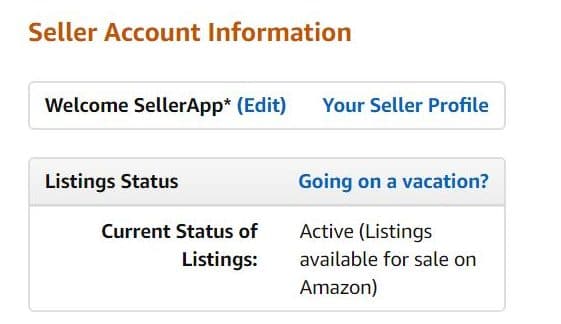
3. Change the marketplaces you don’t want to sell to “Inactive”.
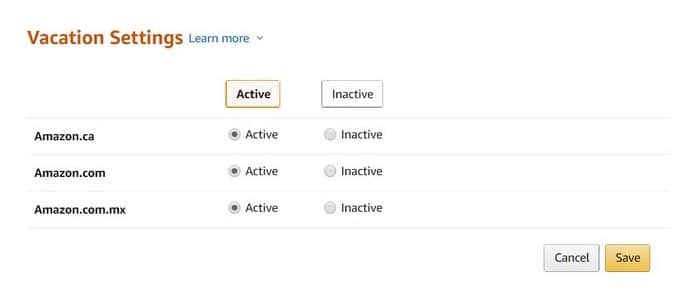
And that’s how you activate Amazon Seller Vacation Mode – it really is that easy, whether you’re an FBA seller or your orders are FBM. Go on vacation without worrying, pause your Amazon seller account (to an extent) and concentrate on enjoying yourself until you get back.
How to Put Your Seller Account on Holiday Settings and the Benefits of Using Vacation Mode
Everyone deserves to have a bit of time off – even Amazon sellers, believe it or not. And although you’re now captaining the ship on Amazon and building/maintaining a trusted seller status, you can definitely get away without dropping any plates and still take a holiday, as long as you plan carefully and in advance, thanks in no small part to vacation mode on Amazon. The tool essentially means that Amazon handles the bulk of the work once your account is in vacation mode, and there are just a few simple steps to turn it on.
Sellers (whether your orders are FBA or FBM) can take a vacation at any time. Ok, it’s not as simple as – turn on vacation mode – there is slightly more to it, but as long as you consider shipping settings, return requests and customer messages (which are all in your Amazon Seller central account) as three priorities, and remember to turn off vacation mode when you get back to your Amazon account, you’re already off to a flying start.
